andrealucini Inviato 9 Gennaio 2016 Segnala Inviato 9 Gennaio 2016 Le mie figlie mi hanno regalato, anzi, si sono regalate, come da titolo , il modello MB339 PAN della Italeri....quindi si inizia....partiamo da chi dovrà pilotarlo...
andrealucini Inviato 9 Gennaio 2016 Autore Segnala Inviato 9 Gennaio 2016 (modificato) ....aggiungiamo qualche particolare ai seggiolini... Modificato 9 Gennaio 2016 da andrealucini
Chris Maxter Inviato 9 Gennaio 2016 Segnala Inviato 9 Gennaio 2016 L'inizio e` promettente! Buon lavoro
andrealucini Inviato 9 Gennaio 2016 Autore Segnala Inviato 9 Gennaio 2016 (modificato) Grazie mille ☺ Modificato 9 Gennaio 2016 da andrealucini
andrealucini Inviato 9 Gennaio 2016 Autore Segnala Inviato 9 Gennaio 2016 Taglio delle plastiche per successiva configurazione ali con flaps in posizione take off Con del plasticard ricostruisco la parte di flap che è annegata nell' ala
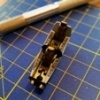
andrealucini Inviato 13 Gennaio 2016 Autore Segnala Inviato 13 Gennaio 2016 ...seggiolini verniciati...
Chris Maxter Inviato 14 Gennaio 2016 Segnala Inviato 14 Gennaio 2016 ...seggiolini verniciati... Mi sembrano ben fatti. L'aereo e` in scala 1/72?
andrealucini Inviato 21 Gennaio 2016 Autore Segnala Inviato 21 Gennaio 2016 Aggiunta di qualche particolare Risultato finale
andrealucini Inviato 23 Gennaio 2016 Autore Segnala Inviato 23 Gennaio 2016 Abitacolo completato con l'aggiunta del pilota
andrealucini Inviato 23 Gennaio 2016 Autore Segnala Inviato 23 Gennaio 2016 Risultato finale flaps on posizione take-off
Robby Inviato 23 Gennaio 2016 Segnala Inviato 23 Gennaio 2016 Risultato finale flaps on posizione take-off Ad occhio direi che sono su land...
franzisket Inviato 4 Febbraio 2016 Segnala Inviato 4 Febbraio 2016 ...si i flap sono troppo abbassati per essere su take-off...
andrealucini Inviato 8 Febbraio 2016 Autore Segnala Inviato 8 Febbraio 2016 ...costruzione basetta cercando di dare dinamicità al modello...
andrealucini Inviato 11 Febbraio 2016 Autore Segnala Inviato 11 Febbraio 2016 ...ed ora manca solo di riprodurre la fumata bianca...
engine Inviato 11 Febbraio 2016 Segnala Inviato 11 Febbraio 2016 Sembra il solista che fa i suoi svolazzi.
andrealucini Inviato 11 Febbraio 2016 Autore Segnala Inviato 11 Febbraio 2016 ...infatti, l'idea è quella di riprodurre il volo pazzo del solista...
andrealucini Inviato 13 Febbraio 2016 Autore Segnala Inviato 13 Febbraio 2016 ...ecco il risultato finale...
vorthex Inviato 13 Febbraio 2016 Segnala Inviato 13 Febbraio 2016 l'idea è interessante ma... l'aereo dovrebbe essere più dritto e i segni sulla pista andrebbero decisamente rivisti.
engine Inviato 13 Febbraio 2016 Segnala Inviato 13 Febbraio 2016 (modificato) Le striscie strette sulla sembrano graffi fatti da una scavatrice . Se puoi cancellale e lascia le sporcature. Quanto all'aereo , quando fa quel numero sembra matto e quindi l'assetto del velivolo rende l'idea. Tuttavia volerlo mettere " più dritto " toglie dinamismo alla scena , secondo me. Inoltre, nei diorami , come nei plastici , è inevitabile in effetto di " compattamento delle distanze " dovuto a motivi di ingombro complessivo dell'opera. Ne sanno qualcosa, per esempio, i fermodellisti , che rappresentano un pesante intercity con sei carrozze. E' giocoforza che l'aereo , visto così, sembra volare ad una quota che , nella realtà , sarebbe eccessivamente bassa. Voler rendere la scena più realistica , mettendo il modello più in alto, rischierebbe di compromettere la stabilità del diorama , aggiungendo poco al realismo. La scena mi ricorda un altro diorama , pubblicato su una rivista di molti anni fa, che rappresentava uno " Zero kamikaze " , avvolto dal fumo, che si stava schiantando in mare , colpito dalla contraerea. Si ispirava ad una foto vera , scattata da una nave americana . La nuvola di fumo era stata fatta con chiara d'uovo montata a neve. Modificato 13 Febbraio 2016 da engine
Messaggi raccomandati
Crea un account o accedi per lasciare un commento
Devi essere un membro per lasciare un commento
Crea un account
Iscriviti per un nuovo account nella nostra community. È facile!
Registra un nuovo accountAccedi
Sei già registrato? Accedi qui.
Accedi Ora