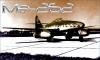
oberst-krieger Inviato 5 Settembre 2008 Segnala Inviato 5 Settembre 2008 Eccolo qua... finalmente l'ho finito! devo dire che non ci ho messo tanto tempo (circa 3 settimane). Nel complesso è un buon modello credo, considerando che è il 6° che faccio ed è il 1° che faccio "seriamente". è stato facile da montare e una grossa mano me l'ha data la Tamiya... Mio padre che fa anche lui modellismo gli ha dato un 6 e mezzo... voi quanto gli date?
Damiano_Tomcatter Inviato 5 Settembre 2008 Segnala Inviato 5 Settembre 2008 Secondo le un bel 7,5 non te lo leva nessuno.. davvero complimentoni
Ospite Peppe Inviato 5 Settembre 2008 Segnala Inviato 5 Settembre 2008 Complimenti Concordo con Damiano!
Blue Sky Inviato 5 Settembre 2008 Segnala Inviato 5 Settembre 2008 (modificato) Realizzazione molto ben curata, l'invecchiamento, è molto realistico, unica pecca (Lievissima) è da attribuire alle due decals Keep Off, per il resto è bellissimo! Modificato 5 Settembre 2008 da Blue Sky
oberst-krieger Inviato 5 Settembre 2008 Autore Segnala Inviato 5 Settembre 2008 Le decals si vedono perchè non ho spruzzato bene il lucido sotto l'ho diluito troppo e perciò non è venuto... lucido, appunto.
Damiano_Tomcatter Inviato 5 Settembre 2008 Segnala Inviato 5 Settembre 2008 Forse con un goccio di future e i trasparenti sarebbero senza dibbio venuti meglio..se non ce l'hai guarda sul topic che ho aperto io per trovarla
Kit Inviato 5 Settembre 2008 Segnala Inviato 5 Settembre 2008 Considerando che questo è il Tuo 6° modello... il giudizio finale è ottimo, peccato per le decals. Con la giusta applicazione delle mani di lucido che dovrebbero essere sempre due, la prima per preparare la superficie all'applicazione delle insegne applicate sempre con ammorbidenti specifici, e la seconda per limitare lo scalino dello spessore delle decals e la percezione del film trasparente che con la terza mano di trasparente opaco, satinato o una combinazione dei due, magari data dopo il lavaggio ad olio per "magia" quasi spariscono.
oberst-krieger Inviato 5 Settembre 2008 Autore Segnala Inviato 5 Settembre 2008 Grazie per i consigli Kit... però devo dire che anche le decals tamiya non è che sono poi tanto all'altezza della casa Sembrano dei cappotti! sono praticamente impermeabili non sono riuscito ad ammorbidirle con niente!
starfighter84 Inviato 6 Settembre 2008 Segnala Inviato 6 Settembre 2008 Bè come sesto modello non è venuto male, le potenzialità ci sono! la mimetica però l'hai realizzata a mano libera con contorni sfumati. In relatà i contorni sono netti e seguono un andamento diverso da quello che hai realizzato te (qui la documentazione è importante). Per ammorbidire le decal pesanti come quelle Tamiya o Hasegawa prova ad usare il Mr.Mark Softer della Gunze che è più aggressivo... ma ad ogni modo con una buona passata di lucido sotto risolvi molti problemi. Mi piace molto l'invecchiamento invece!
oberst-krieger Inviato 6 Settembre 2008 Autore Segnala Inviato 6 Settembre 2008 Stavo aspettando il tuo giudizio starfighter! Per i contorni... credevo fossero sfumati anche nella realtà però ho seguito il disegno delle istruzioni con molta precisione... vabbè forse non era abbastanza. Come ammorbidente ho usato quello della maskol che se non mi sbaglio si chiama MR. Surfacer però ho anche quello della Gunze Volevo chiedervi una cosa: quale lucido mi consigliate? ho usato quello della vallejo però era troppo diluito...
Ospite Folgore Inviato 9 Settembre 2008 Segnala Inviato 9 Settembre 2008 Molto bello! Ma sbaglio o il parabrezza è un pò.... colorato? intendo i due trasparenti anteriori
oberst-krieger Inviato 9 Settembre 2008 Autore Segnala Inviato 9 Settembre 2008 Molto bello! Ma sbaglio o il parabrezza è un pò.... colorato? intendo i due trasparenti anteriori No il problema è che ci ho fatto cadere la trementina sopra per non farlo vedere glio ho buttato sopra chili di "terra di siena" per far sembrare che era sporco... La trementina si è mangiata pure i 4 cannoni davanti infatti li ho dovuti rifare tutti e 4
navigator Inviato 9 Settembre 2008 Segnala Inviato 9 Settembre 2008 Ciao! Io ti faccio i complimenti. Per quello che me ne capisco hai fatto un ottimo lavoro. Le tecniche che usi sono tutte giuste. Hai avuto solo un po di sfiga e magari conoscevi poco l'aereo, il disegno della mimetica in effetti e' un po troppo sfumato. Tutti errori che si correggono facilmente... Bravò Bravò Bravò... Navigator
oberst-krieger Inviato 9 Settembre 2008 Autore Segnala Inviato 9 Settembre 2008 Grazie a tutti dei complimenti, e grazie ancora di più per le correzioni... ho ancora molto da imparare e spero che il prossimo modello vi piaccia ancora di più
Kit Inviato 9 Settembre 2008 Segnala Inviato 9 Settembre 2008 spero che il prossimo modello vi piaccia ancora di più Una cosa che non si nota ma esiste nel modellismo, è che ogni modello ci insegna qualcosa di nuovo....
vorthex Inviato 9 Settembre 2008 Segnala Inviato 9 Settembre 2008 Una cosa che non si nota ma esiste nel modellismo, è che ogni modello ci insegna qualcosa di nuovo.... wink.gif sopratutto nuove fantastiche bestemmie :asd:
Ospite Andrea29 Inviato 10 Settembre 2008 Segnala Inviato 10 Settembre 2008 complimenti krieger hai fatto veramente un ottimo lavoro
Madd 22 Inviato 10 Settembre 2008 Segnala Inviato 10 Settembre 2008 Anche io voglio dare il mio parere A me piace tanto...7 e 1/2 va benone...molto bene il processo di invecchiamento, me piasce! peccato per i trasparenti, ma la prossima volta non capiterà più... Bravo Ciau
oberst-krieger Inviato 10 Settembre 2008 Autore Segnala Inviato 10 Settembre 2008 Grazie ancora! Però mi avete fatto tanti complimenti sull'invecchiamento, anche se a me non è piaciuto tanto: quando l'ho finito tutto sono stato un giorno a guardarlo per capire cosa avevo sbagliato e sinceramente mi sono accorto che l'invecchiamento è "piatto": ho sporcato tutto l'aereo con UN solo colore (Bitume di Giudea) e con UNA sola tecnica (ho preso un vecchio pennello sintetico, gli ho tagliato un pò le setole e poi ho fatto il drybrushing). niente aerografo. se è venuto bene come dite, forse è perchè mi piace disegnare e l'ho preso un pò per un "disegno" quest'aereo... come ha detto kit si impara un pò da ogni modello
Damiano_Tomcatter Inviato 10 Settembre 2008 Segnala Inviato 10 Settembre 2008 Sarà come dici tu ma l'invecchiamento è riuscito molto bene
Blue Sky Inviato 10 Settembre 2008 Segnala Inviato 10 Settembre 2008 Però mi avete fatto tanti complimenti sull'invecchiamento, anche se a me non è piaciuto tanto: Non condivido, l'invecchiamento è (Personalmente parlando) uno dei punti forza della realizzazione, infatti dona al modello un effetto estremamente realistico!
sidewinder89 Inviato 12 Settembre 2008 Segnala Inviato 12 Settembre 2008 Beh, direi che obiettivamente è un 7 e mezzo (considerando che è il tuo sesto modello anche un 8)...usando la procedura colorazione-lucido-decals-lucido-lavaggio-opaco sarebbe stato anche meglio...alla fine l'unico difettuccio è il bordo trasparente delle decals, per il resto è molto ben fatto...col tempo e con gli errori si migliora sempre di più...continua così!!!
luky54 Inviato 12 Settembre 2008 Segnala Inviato 12 Settembre 2008 Grazie ancora! Però mi avete fatto tanti complimenti sull'invecchiamento, anche se a me non è piaciuto tanto: quando l'ho finito tutto sono stato un giorno a guardarlo per capire cosa avevo sbagliato e sinceramente mi sono accorto che l'invecchiamento è "piatto": ho sporcato tutto l'aereo con UN solo colore (Bitume di Giudea) e con UNA sola tecnica (ho preso un vecchio pennello sintetico, gli ho tagliato un pò le setole e poi ho fatto il drybrushing). niente aerografo. se è venuto bene come dite, forse è perchè mi piace disegnare e l'ho preso un pò per un "disegno" quest'aereo... come ha detto kit si impara un pò da ogni modello anche a me piace molto disegnare! in ogni caso come ho già detto è un ottimo modello
Messaggi raccomandati
Crea un account o accedi per lasciare un commento
Devi essere un membro per lasciare un commento
Crea un account
Iscriviti per un nuovo account nella nostra community. È facile!
Registra un nuovo accountAccedi
Sei già registrato? Accedi qui.
Accedi Ora